-
Products
 ProductsExperience the best selection at Baliya. Our leather bags and goods exude quality and charm. Inquire now for exclusive deals and custom quotes!
For anyone who appreciates the craftsmanship behind a high-quality leather bag, the difference between a good design and an exceptional one often lies in the details—specifically, leather bag edge finishing. This often-overlooked step is what transforms raw, rough leather edges into smooth, long-lasting accents that elevate the entire piece, whether you’re curious about how are leather bags made in professional factories or experimenting with how to design a leather bag at home. Factory artisans spend years perfecting this process, as it directly impacts a bag’s durability (preventing fraying and moisture damage) and visual appeal (creating a seamless, luxury finish). Let’s dive into the techniques that make great leather bag edge finishing possible.
Before artisans begin shaping or sealing leather edges, proper preparation lays the groundwork for success. Seasoned craftsmen know it’s essential to avoid rework later—especially when aligned with how are leather bags made in efficient factories.
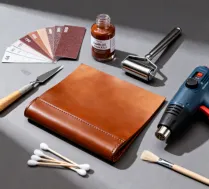
Factory workshops stock specific tools to streamline leather bag edge finishing:
• Edge beveler: Trims sharp, 90-degree edges into a gentle slope, reducing bulk and making steps easier.
• Sandpaper set: Grits ranging from 240 (for initial smoothing) to 1000 (for final polishing) ensure gradual, scratch-free refinement.
• Leather edge paint: Water-based or acrylic formulas (matched to the bag’s color) add pigment and protection; factories often use custom-mixed shades for brand consistency.
• Edge roller: Presses paint into the leather fibers, creating a tight bond, and a heat gun (used sparingly) speeds up drying without damaging the leather.
• Cotton swabs or small brushes: For precise paint application on narrow edges, like those on strap loops.
1.2 Leather Edge Preprocessing
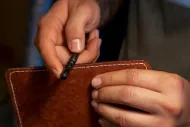
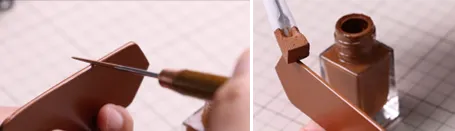
First, artisans trim excess leather with a sharp utility knife to ensure edges are straight—this is a detail that ties back to how to design a leather bag, as pattern cutting accuracy directly affects edge quality. Next, they use the edge beveler to shape the edge (a 45-degree angle is standard for most bags). Finally, a quick pass with 240-grit sandpaper removes any frayed fibers, creating a clean base for the next steps.
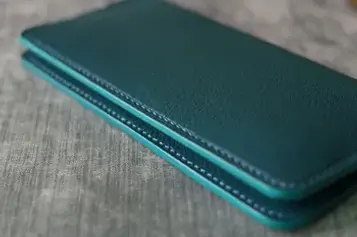
This phase is where raw edges become polished accents, and it’s the heart of how are leather bags made to last. Factory artisans follow a sequential process to ensure consistency and durability.
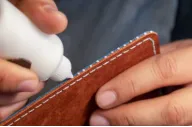
Polishing is more than just sanding—it’s about refining the edge to a near-mirror finish. Artisans start with 400-grit sandpaper, sanding in one direction (never back and forth) to avoid creating new scratches. They then move to 600-grit, and finally 1000-grit, wiping away dust with a dry cloth between each step. For thicker leathers (like those used in tote bags), some factories add a light coat of leather conditioner before sanding to soften the fibers—this small step enhances the final polish of leather bag edge finishing.
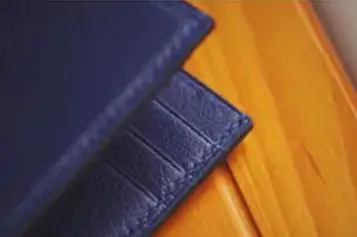
Once the edge is smooth, it’s time to apply edge paint. Artisans dip a small brush into the paint (loading just enough to cover the edge without dripping) and apply a thin, even coat. Factories emphasize “thin coats over thick ones”—a single thick coat is prone to cracking, while 2-3 thin coats bond better. After each coat, they use the edge roller to press the paint into the leather, then let it dry for 15-20 minutes (or use a low-heat heat gun to speed up drying). Between coats, a light sand with 800-grit sandpaper ensures the next layer adheres smoothly. This step is where how to design a leather bag comes into play again—bold colors may require extra coats, while neutral tones might need only two to match the bag’s exterior.

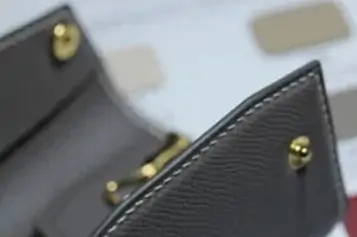
Sealing is the final step in leather bag edge finishing, and it’s what protects the edge from wear, moisture, and fading. Artisans use a clear, water-resistant edge sealer (often a polyurethane-based formula) and apply a thin coat over the dried edge paint. They let it dry completely (30 minutes to an hour) before doing a final polish with a soft cloth to bring out the shine. Some high-end factories add a second sealer coat for bags designed for heavy use (like work bags or backpacks), ensuring the edge stays intact even with daily wear.
Even experienced artisans face challenges, but knowing how to fix them ensures consistent results—whether you’re following how are leather bags made in factories or designing your own piece.
If an edge remains rough after sanding, the issue often lies in the initial beveling. Artisans will re-bevel the edge (taking care not to remove too much leather) and start the sanding process again with a coarser grit. For uneven paint application, they sand the problematic area with 800-grit sandpaper to remove excess paint, then apply a new thin coat.

Cracking usually happens when the paint is too thick or the leather is dry. Artisans sand off the cracked paint, apply a small amount of leather conditioner to hydrate the edge, and then reapply thin coats of paint. Peeling often occurs if the edge wasn’t properly cleaned—wiping the edge with rubbing alcohol before painting removes oils that prevent adhesion, a trick factory workers swear by for reliable leather bag edge finishing.
In the world of leather craftsmanship, edge treatment is more than just the finishing touch – it’s a hallmark of quality, bridging the gap between industrial leather production and meticulously handcrafted designs, resulting in bags with durable edges and a beautiful finish that will stand the test of time. These techniques prove that the essence of leather craftsmanship lies in the details.